Species
Why do we use species instead of elements? Because some atoms are special:
Different colors for one element.
Different properties for one element, such as: spin up and down.
ghost atoms: vacancy, highlight sphere, cavity
atoms with different bondsetting
Color
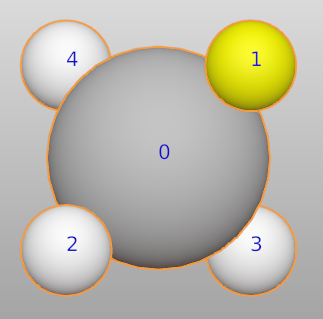
For example, we want to change the color of one hydrogen atom in CH4 molecule.
>>> from ase.build import molecule
>>> from batoms import Batoms
>>> import numpy as np
>>> ch4 = Batoms("ch4", from_ase = molecule('CH4'))
Here, we replace the first H atom with a new species (“H_1”).
>>> ch4.replace([1], "H_1")
>>> ch4["H_1"].color = (1.0, 1.0, 0.0, 1.0)
Another example:
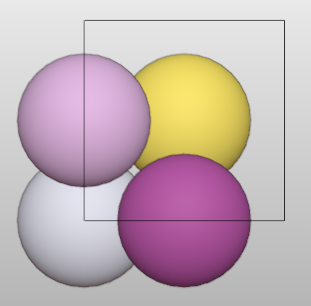
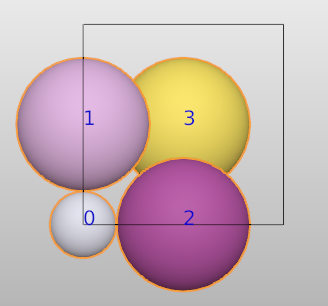
>>> from ase.build import bulk
>>> from batoms import Batoms
>>> import numpy as np
>>> au = Batoms(label = "au", from_ase = bulk('Au', cubic = True))
>>> for i in range(len(au)):
>>>     au.replace([i], "Au_%i"%i)
>>> au["Au_0"].color = [0.8, 0.8, 0.9, 1.0]
>>> au["Au_1"].color = [0.8, 0.5, 0.8, 1.0]
>>> au["Au_2"].color = [0, 0.7, 0.4, 1.0]
>>> au["Au_2"].color = [0.5, 0.1, 0.4, 1.0]
Note
Be careful, if the name of the new species does not start with “Au_” (Au is the element to be replaced). Then, use this format:
>>> au.replace([0, 1], ["a100", {"elements":{"Au":{"occupancy":1.0}}}])
The name should not be longer than four characters.
If you only need to change the scale of individual atoms. You can use:
>>> Au[0].scale = 2
Polyhedra with different species
This is an example to show different polyhedras for the same element, but different species. First, we read a TiO2 structure from the file.
>>> from batoms.bio import read
>>> tio2 = read("../tests/datas/tio2.cif")

There are two Ti atoms in the unit cell. Switching to Edit mode (shortcut key:Tab), we find the indices are 0 and 1 for these two Ti atoms.
Switching back to Object mode (shortcut key:Tab). We set the first one to a new species Ti_1.
>>> tio2.replace([0], 'Ti_1')
For the newly added Ti_1 species, there is a default setting for the bonds. As shown by:
>>> tio2.bond.setting
Bondpair    min     max   Search_bond    Polyhedra style
Ti-O        0.000   2.760      1            True        1
O-O         0.000   1.820      1            False       1
Ti_1-O      0.000   2.760      1            True        1
------------------------------------------------------------
There is also a default setting of Ti_1 for polyhedras. As shown by:
>>> tio2.polyhedra.settings
Center                color         width
Ti           [0.75  0.76  0.78  1.00]   0.010
Ti_1         [0.75  0.76  0.78  1.00]   0.010
------------------------------------------------------------
To make the polyhedra different from another Ti species, we change its color.
>>> tio2.polyhedra.settings['Ti_1'].color = (0, 1, 1, 0.8)
Redraw the structure:
>>> tio2.model_style = 2

If you want to add transparency for the polyhedra, please read Color setting page for more setup.
Auto build species based on equivalent_atoms
Here is a example with magnetite. In the magnetite.cif file, there are three Fe species and two O species:
Fe2 Fe+2 0.5000 0.5000 0.5000 1 0.0
Fe3 Fe+3 0.6253 0.6253 0.6253 1 0.0
O2  O-2  0.3817 0.3817 0.3817 1 0.0
O1  O-2  0.8722 0.8722 0.8722 1 0.0
Fe1 Fe+2 0.0000 0.0000 0.0000 1 0.0
After reading the structure, the symmetry information is lost. Especially the species (symmetrically equivalent atoms) are lost. There are only one Fe and O species:
>>> from batoms.bio.bio import read
>>> bpy.ops.batoms.delete()
>>> magnetite = read("../tests/datas/magnetite.cif")
>>> magnetite.species
Bspecies(species = 'Fe', elements = [('Fe', 1.0)], color = [0.88 0.4  0.2  1.  ])
Bspecies(species = 'O', elements = [('O', 1.0)], color = [1.   0.05 0.05 1.  ])
By using auto_build_species, we can re-biuld the species based on equivalent_atoms using spglib libray:
>>> magnetite.auto_build_species()
>>> magnetite.species
Bspecies(species = 'Fe', elements = [('Fe', 1.0)], color = [0.88 0.4  0.2  1.  ])
Bspecies(species = 'O', elements = [('O', 1.0)], color = [1.   0.05 0.05 1.  ])
Bspecies(species = 'Fe_1', elements = [('Fe', 1.0)], color = [0.88 0.4  0.2  1.  ])
Bspecies(species = 'Fe_2', elements = [('Fe', 1.0)], color = [0.88 0.4  0.2  1.  ])
Bspecies(species = 'O_1', elements = [('O', 1.0)], color = [1.   0.05 0.05 1.  ])
In this case, one can easily draw different polyhedra for different species. Change color for the polyhedra of different species.
>>> magnetite.polyhedra.settings['Fe_1'].color[:] = [0, 0.8, 0, 0.8]
>>> magnetite.polyhedra.settings['Fe_2'].color[:] = [0, 0, 0.8, 0.8]
>>> magnetite.model_style = 2
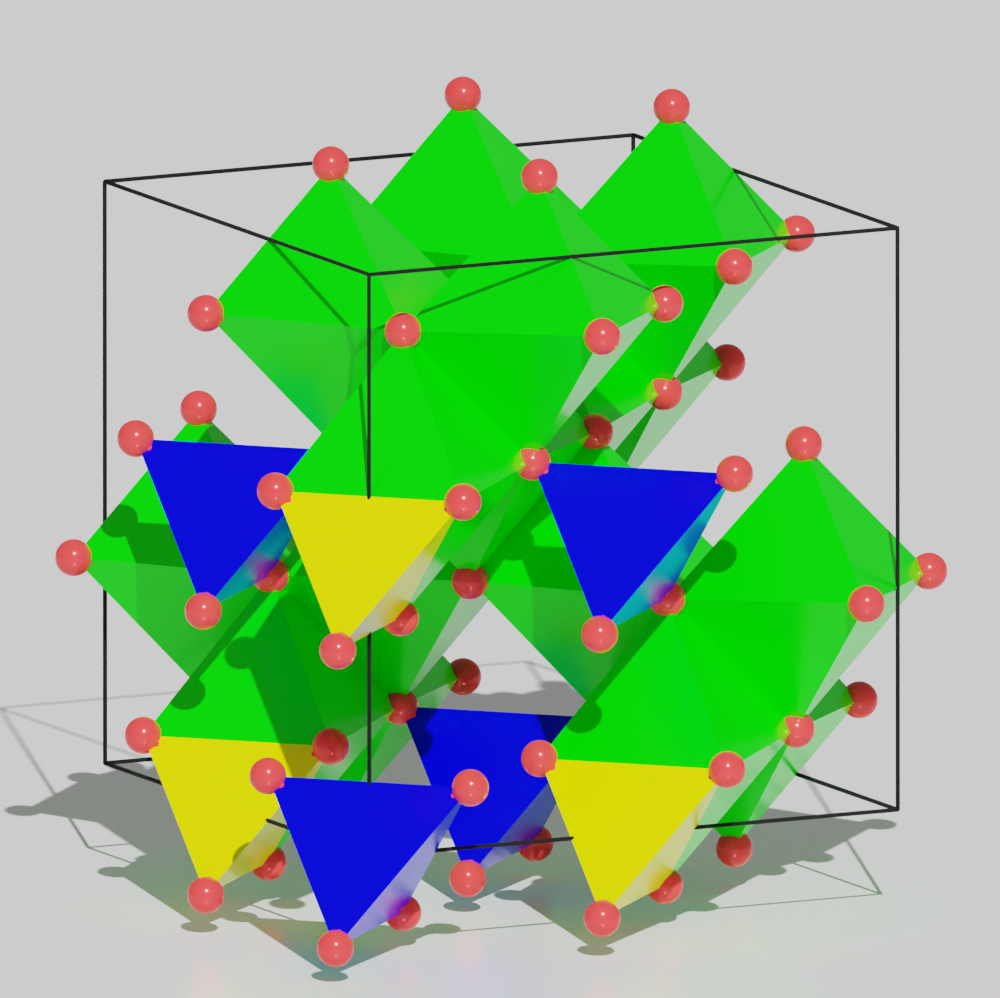
One can download the python script for the aboved image: tutorial_species_auto_build_species.py